基本概念 基本上,在所有的开发的系统中,都必须做认证(authentication)和授权(authorization),以保证系统的安全性。
认证是确认声明者的本身身份,其作为授权的上游衔接而存在
鉴权是对声明者所声明的真实性进行确认的过程,其作为授权的下游衔接而存在
Spring Security 是一个功能强大且高度可定制的身份验证和访问控制框架。它是用于保护基于 Spring 的应用程序。
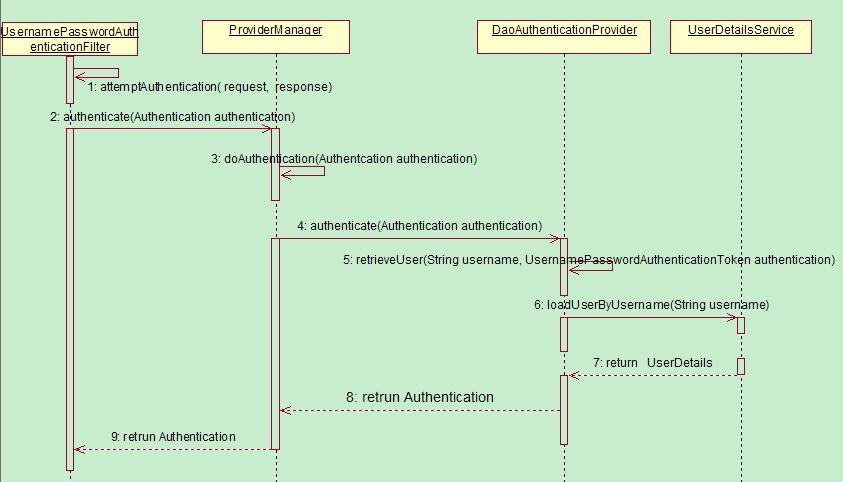
认证链路 1 用户名和密码被过滤器获取到,封装成Authentication,通常情况下是UsernamePasswordAuthenticationToken这个实现类。
2 AuthenticationManager 身份管理器负责验证这个Authentication
3 认证成功后,AuthenticationManager身份管理器返回一个被填充满了信息的(包括上面提到的权限信息,身份信息,细节信息,但密码通常会被移除)Authentication实例。
4 SecurityContextHolder安全上下文容器将第3步填充了信息的Authentication,通过SecurityContextHolder.getContext().setAuthentication(…)方法,设置到其中。
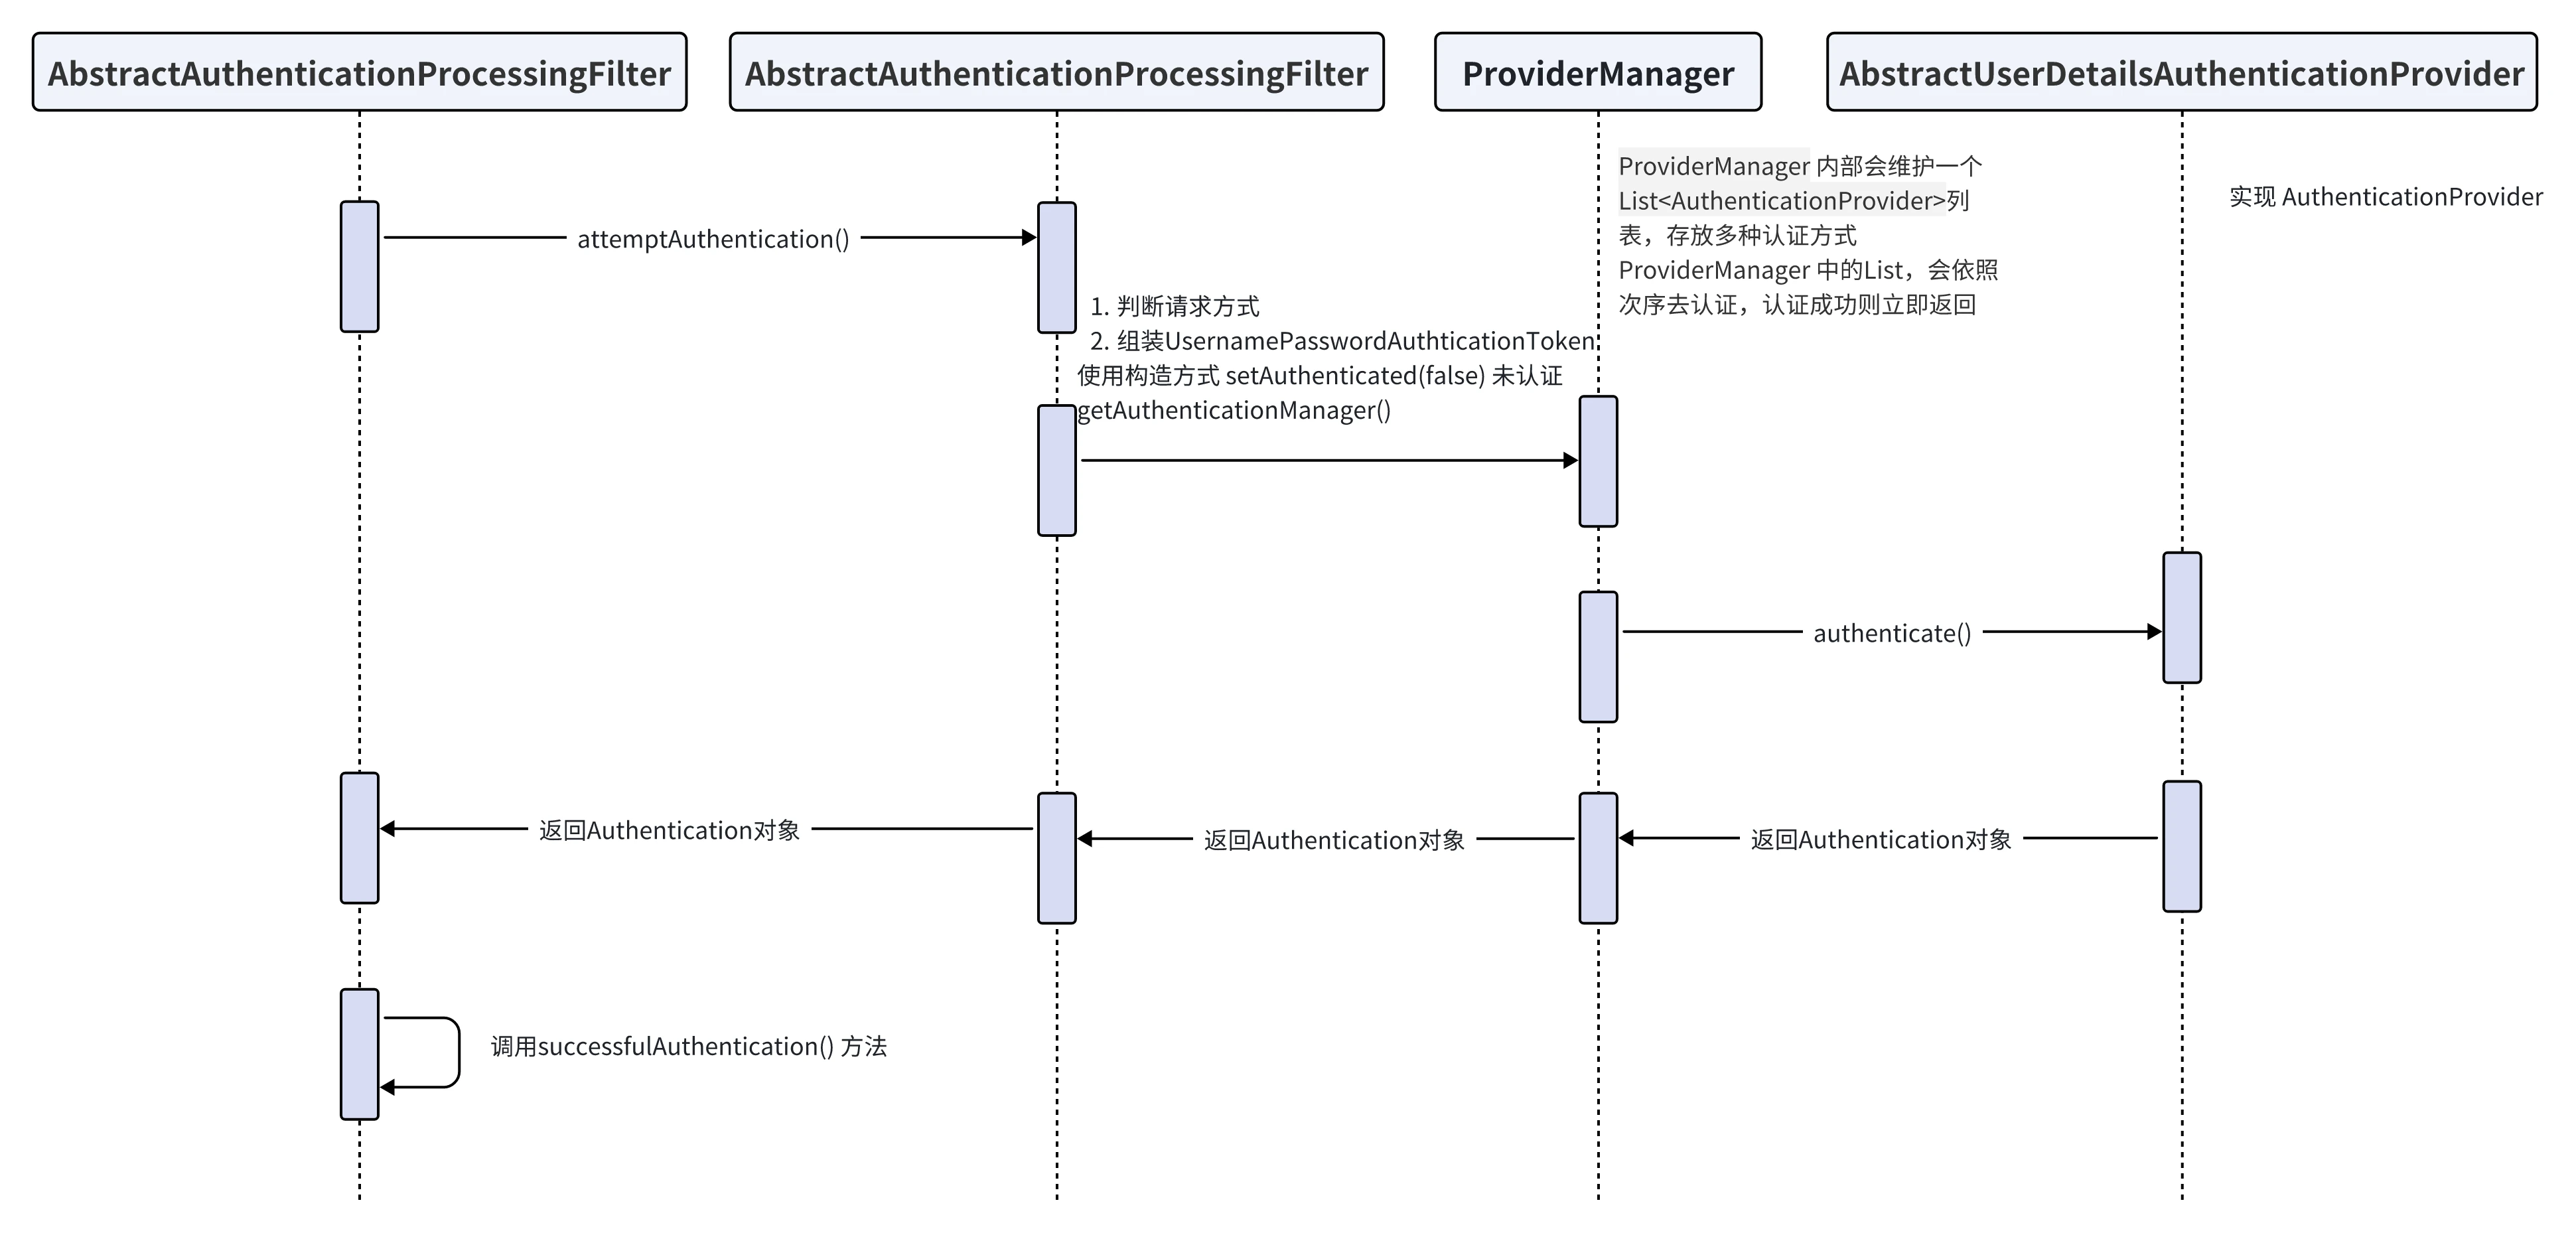
AuthenticationManager AuthenticationManager(接口)是认证相关的核心接口,也是发起认证的出发点。AuthenticationManager一般不直接认证,AuthenticationManager接口的常用实现类ProviderManager 内部会维护一个List<AuthenticationProvider>列表,存放多种认证方式,实际上这是委托者模式的应用(Delegate)。
1
2
3
4
5
6
7
8
9
10
11
12
13
14
15
16
17
18
19
20
21
22
23
24
25
26
27
28
29
30
31
32
33
34
35
36
37
38
39
40
41
42
43
44
45
46
47
48
49
50
51
52
53
public class ProviderManager implements AuthenticationManager , MessageSourceAware, InitializingBean { private List<AuthenticationProvider> providers = Collections.emptyList(); public Authentication authenticate (Authentication authentication) throws AuthenticationException { Class<? extends Authentication > toTest = authentication.getClass(); AuthenticationException lastException = null ; Authentication result = null ; for (AuthenticationProvider provider : getProviders()) { if (!provider.supports(toTest)) { continue ; } try { result = provider.authenticate(authentication); if (result != null ) { copyDetails(authentication, result); break ; } } ... catch (AuthenticationException e) { lastException = e; } } if (result != null ) { if (eraseCredentialsAfterAuthentication && (result instanceof CredentialsContainer)) { ((CredentialsContainer) result).eraseCredentials(); } eventPublisher.publishAuthenticationSuccess(result); return result; } ... if (lastException == null ) { lastException = new ProviderNotFoundException (messages.getMessage( "ProviderManager.providerNotFound" , new Object [] { toTest.getName() }, "No AuthenticationProvider found for {0}" )); } prepareException(lastException, authentication); throw lastException; } }
ProviderManager 中的List,会依照次序去认证,认证成功则立即返回,若认证失败则返回null,下一个AuthenticationProvider会继续尝试认证,如果所有认证器都无法认证成功,则ProviderManager 会抛出一个ProviderNotFoundException异常。
DaoAuthenticationProvider:它获取用户提交的用户名和密码,比对其正确性,如果正确,返回一个数据库中的用户信息(假设用户信息被保存在数据库中)。
核心配置解读 拿 ruoyi 的 SecurityConfig 举例,它继承了 WebSecurityConfigurerAdapter。
适配器模式在spring中被广泛的使用,在配置中使用Adapter的好处便是,我们可以选择性的配置想要修改的那一部分配置,而不用覆盖其他不相关的配置。WebSecurityConfigurerAdapter中我们可以选择自己想要修改的内容,来进行重写,而其提供了三个configure重载方法。
configure(HttpSecurity)
configure(WebSecurity)
configure(AuthenticationManagerBuilder)
1 2 3 4 5 6 7 8 9 10 11 12 13 14 15 16 17 18 19 20 21 22 23 24 25 26 27 28 29 30 31 32 33 34 35 36 37 38 39 40 41 42 43 44 45 46 47 48 49 50 51 52 53 54 55 56 57 58 59 60 61 62 63 64 65 66 67 68 69 70 71 72 73 74 75 76 77 78 79 80 81 82 83 84 85 86 87 88 89 90 91 92 93 94 95 96 97 98 99 100 101 102 103 104 105 106 107 108 109 110 111 112 113 114 115 116 117 118 119 120 121 122 123 124 125 126 127 @EnableGlobalMethodSecurity(prePostEnabled = true, securedEnabled = true) public class SecurityConfig extends WebSecurityConfigurerAdapter { @Autowired private UserDetailsService userDetailsService; @Autowired private AuthenticationEntryPointImpl unauthorizedHandler; @Autowired private LogoutSuccessHandlerImpl logoutSuccessHandler; @Autowired private JwtAuthenticationTokenFilter authenticationTokenFilter; @Autowired private CorsFilter corsFilter; @Autowired private PermitAllUrlProperties permitAllUrl; @Bean @Override public AuthenticationManager authenticationManagerBean () throws Exception { return super .authenticationManagerBean(); } @Override protected void configure (HttpSecurity httpSecurity) throws Exception { ExpressionUrlAuthorizationConfigurer<HttpSecurity>.ExpressionInterceptUrlRegistry registry = httpSecurity.authorizeRequests(); permitAllUrl.getUrls().forEach(url -> registry.antMatchers(url).permitAll()); httpSecurity .csrf().disable() .headers().cacheControl().disable().and() .exceptionHandling().authenticationEntryPoint(unauthorizedHandler).and() .sessionManagement().sessionCreationPolicy(SessionCreationPolicy.STATELESS).and() .authorizeRequests() .antMatchers("/login" , "/register" , "/captchaImage" ).permitAll() .antMatchers(HttpMethod.GET, "/" , "/*.html" , "/**/*.html" , "/**/*.css" , "/**/*.js" , "/profile/**" ).permitAll() .antMatchers("/swagger-ui.html" , "/swagger-resources/**" , "/webjars/**" , "/*/api-docs" , "/druid/**" ).permitAll() .antMatchers("/test/*" ,"/policy/*" ,"/type/*" ).permitAll() .anyRequest().authenticated() .and() .headers().frameOptions().disable(); httpSecurity.logout().logoutUrl("/logout" ).logoutSuccessHandler(logoutSuccessHandler); httpSecurity.addFilterBefore(authenticationTokenFilter, UsernamePasswordAuthenticationFilter.class); httpSecurity.addFilterBefore(corsFilter, JwtAuthenticationTokenFilter.class); httpSecurity.addFilterBefore(corsFilter, LogoutFilter.class); } @Bean public BCryptPasswordEncoder bCryptPasswordEncoder () { return new BCryptPasswordEncoder (); } @Override protected void configure (AuthenticationManagerBuilder auth) throws Exception { auth.userDetailsService(userDetailsService).passwordEncoder(bCryptPasswordEncoder()); } }
HttpSecurity常用配置 1 2 3 4 5 6 7 8 9 10 11 12 13 14 15 16 17 18 19 20 21 22 23 24 25 26 27 28 29 @Configuration @EnableWebSecurity public class CustomWebSecurityConfig extends WebSecurityConfigurerAdapter { @Override protected void configure (HttpSecurity http) throws Exception { http .authorizeRequests() .antMatchers("/resources/**" , "/signup" , "/about" ).permitAll() .antMatchers("/admin/**" ).hasRole("ADMIN" ) .antMatchers("/db/**" ).access("hasRole('ADMIN') and hasRole('DBA')" ) .anyRequest().authenticated() .and() .formLogin() .usernameParameter("username" ) .passwordParameter("password" ) .failureForwardUrl("/login?error" ) .loginPage("/login" ) .permitAll() .and() .logout() .logoutUrl("/logout" ) .logoutSuccessUrl("/index" ) .permitAll() .and() .httpBasic() .disable(); } }
上述是一个使用Java Configuration配置HttpSecurity的典型配置,其中http作为根开始配置,每一个and()对应了一个模块的配置(等同于xml配置中的结束标签),并且and()返回了HttpSecurity本身,于是可以连续进行配置。他们配置的含义也非常容易通过变量本身来推测,
authorizeRequests()配置路径拦截,表明路径访问所对应的权限,角色,认证信息。
formLogin()对应表单认证相关的配置
logout()对应了注销相关的配置
httpBasic()可以配置basic登录
etc
WebSecurity常用配置 1 2 3 4 5 6 7 8 9 10 @Configuration @EnableWebSecurity public class WebSecurityConfig extends WebSecurityConfigurerAdapter { @Override public void configure (WebSecurity web) throws Exception { web .ignoring() .antMatchers("/resources/**" ); } }
AuthenticationManagerBuilder 1 2 3 4 5 6 7 8 9 10 11 @Configuration @EnableWebSecurity public class WebSecurityConfig extends WebSecurityConfigurerAdapter { @Override protected void configure (AuthenticationManagerBuilder auth) throws Exception { auth .inMemoryAuthentication() .withUser("admin" ).password("admin" ).roles("USER" ); } }
想要在WebSecurityConfigurerAdapter中进行认证相关的配置,可以使用configure(AuthenticationManagerBuilder auth)暴露一个AuthenticationManager的建造器:AuthenticationManagerBuilder 。如上所示,我们便完成了内存中用户的配置。
除了以上的示例代码,还有另外一种配置方法。
1 2 3 4 5 6 7 8 9 10 11 @Configuration @EnableWebSecurity public class WebSecurityConfig extends WebSecurityConfigurerAdapter { @Autowired public void configureGlobal (AuthenticationManagerBuilder auth) throws Exception { auth .inMemoryAuthentication() .withUser("admin" ).password("admin" ).roles("USER" ); } }
如果你的应用只有唯一一个WebSecurityConfigurerAdapter,那么他们之间的差距可以被忽略,从方法名可以看出两者的区别:
使用@Autowired注入的AuthenticationManagerBuilder是全局的身份认证器,作用域可以跨越多个WebSecurityConfigurerAdapter,以及影响到基于Method的安全控制;
而 protected configure()的方式则类似于一个匿名内部类,它的作用域局限于一个WebSecurityConfigurerAdapter内部。
授权链路
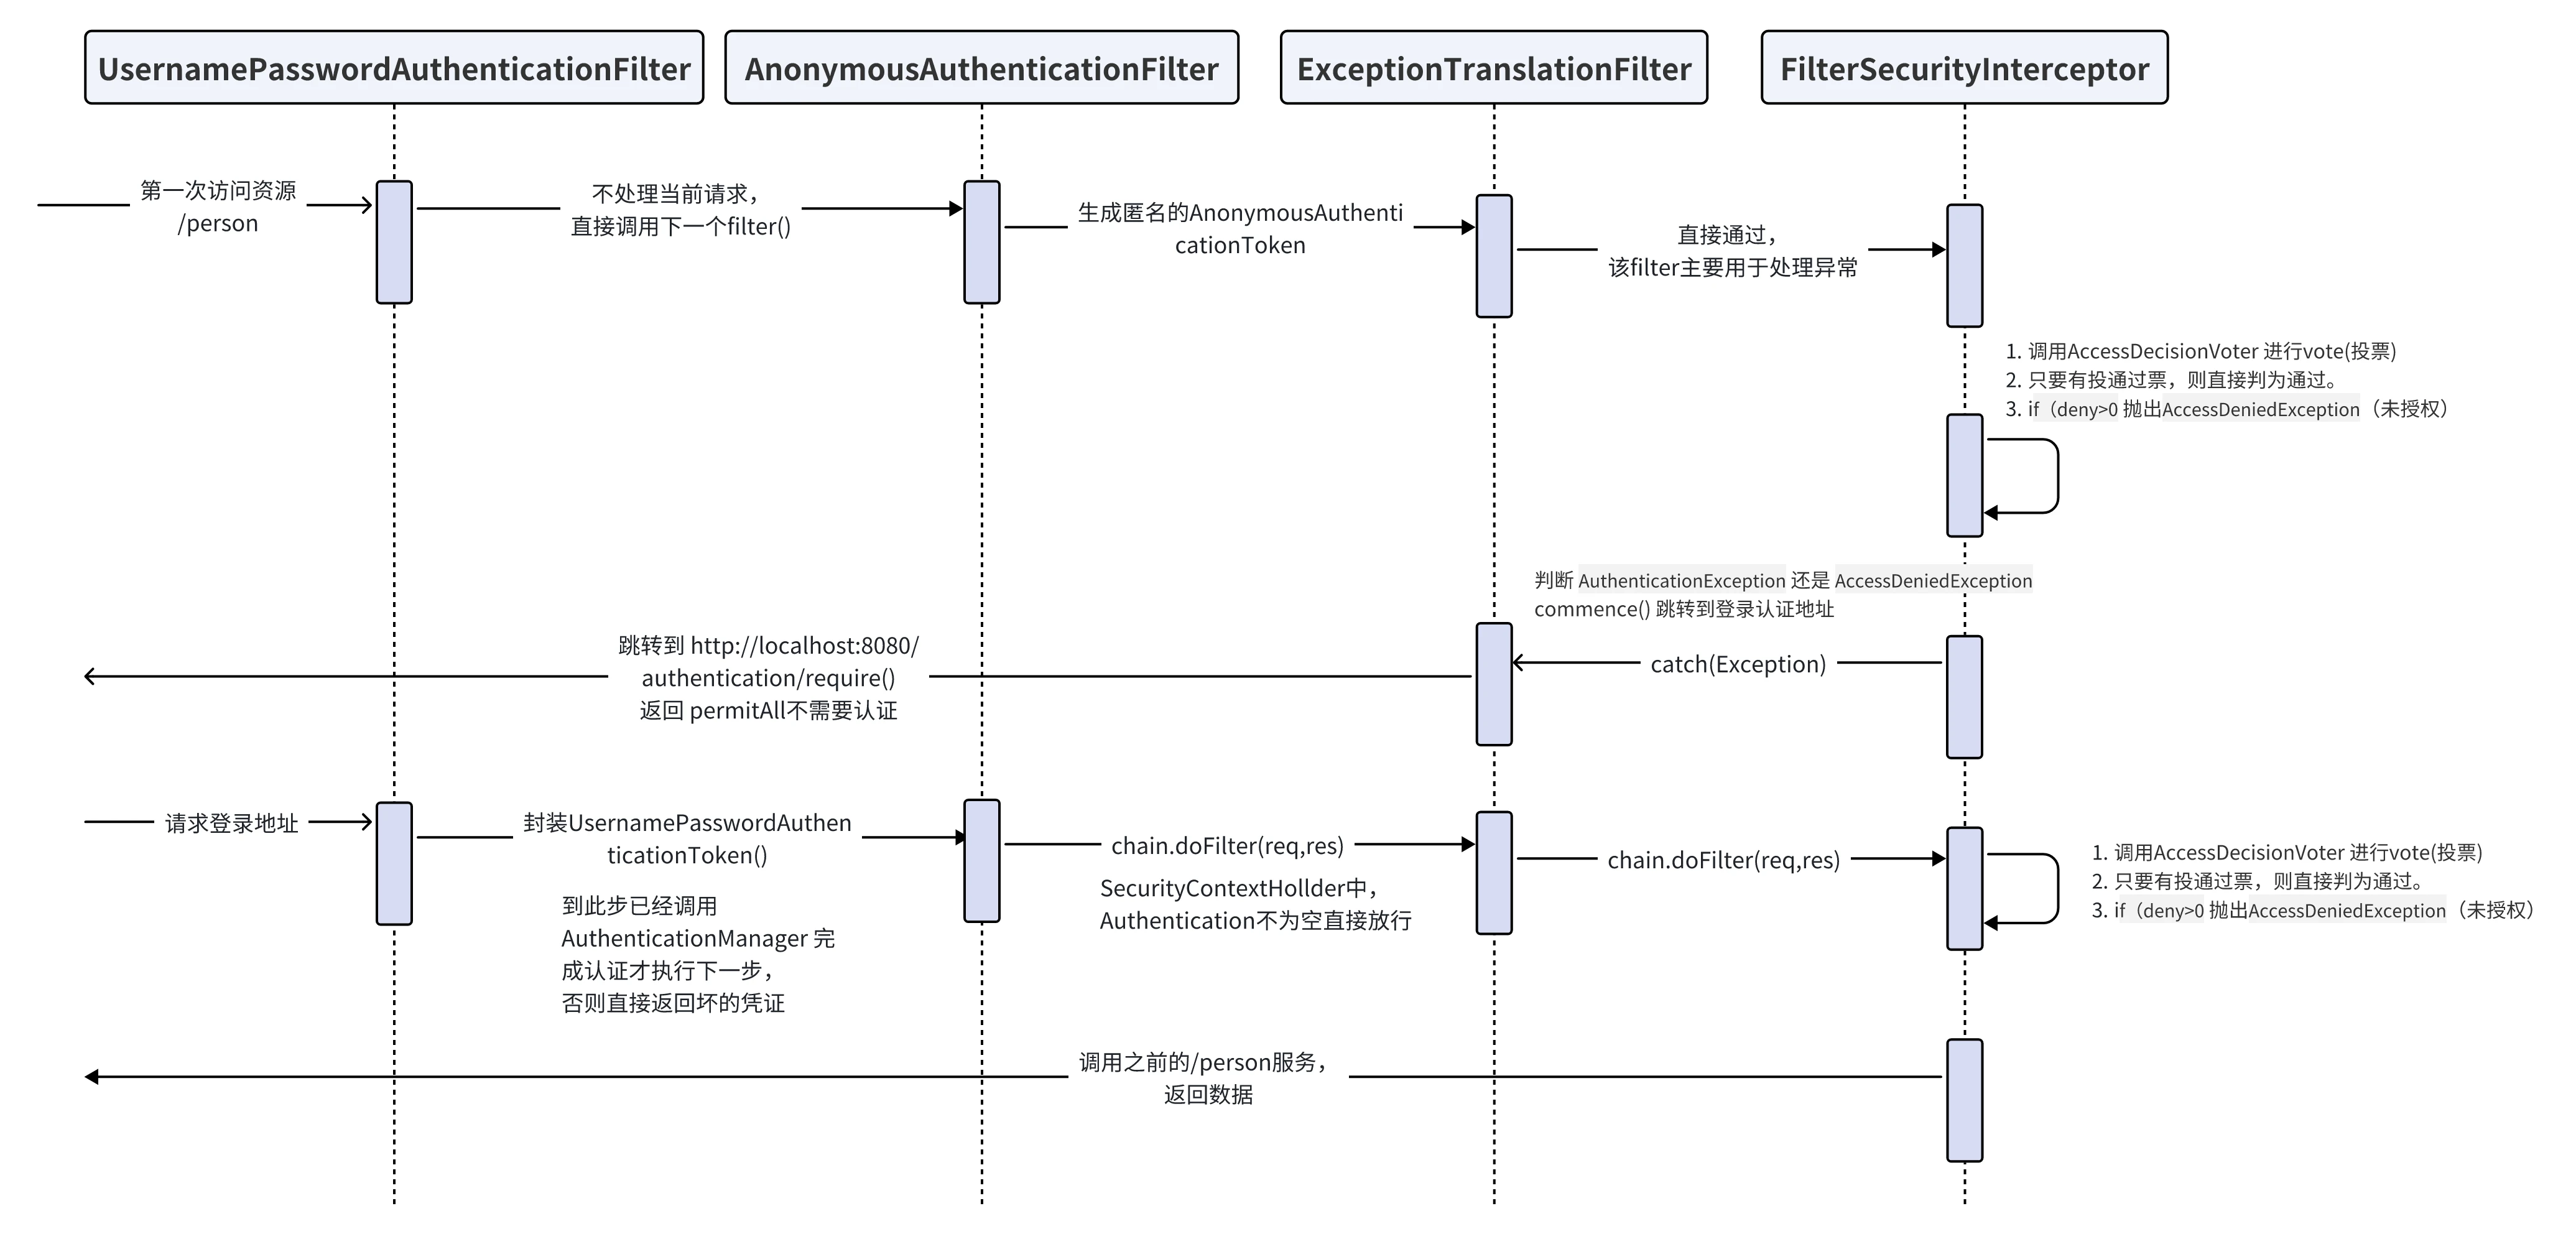
UsernamePasswordAuthenticationFilter 整个调用流程是,先调用其父类 AbstractAuthenticationProcessingFilter.doFilter() 方法,然后再执行 UsernamePasswordAuthenticationFilter.attemptAuthentication() 方法进行验证;
AbstractAuthenticationProcessingFilter:
1 2 3 4 5 6 7 8 9 10 11 12 13 14 15 16 17 18 19 20 21 22 23 24 25 26 27 28 29 30 31 32 33 34 35 36 37 38 39 40 41 42 43 44 45 46 47 48 49 50 51 52 public void doFilter (ServletRequest req, ServletResponse res, FilterChain chain) throws IOException, ServletException { HttpServletRequest request = (HttpServletRequest) req; HttpServletResponse response = (HttpServletResponse) res; #1. 判断当前的filter是否可以处理当前请求,不可以的话则交给下一个filter处理 if (!requiresAuthentication(request, response)) { chain.doFilter(request, response); return ; } if (logger.isDebugEnabled()) { logger.debug("Request is to process authentication" ); } Authentication authResult; try { #2. 抽象方法由子类UsernamePasswordAuthenticationFilter实现 authResult = attemptAuthentication(request, response); if (authResult == null ) { return ; } #2. 认证成功后,处理一些与session相关的方法 sessionStrategy.onAuthentication(authResult, request, response); } catch (InternalAuthenticationServiceException failed) { logger.error( "An internal error occurred while trying to authenticate the user." , failed); #3. 认证失败后的的一些操作 unsuccessfulAuthentication(request, response, failed); return ; } catch (AuthenticationException failed) { unsuccessfulAuthentication(request, response, failed); return ; } if (continueChainBeforeSuccessfulAuthentication) { chain.doFilter(request, response); } #3. 认证成功后的相关回调方法 主要将当前的认证放到SecurityContextHolder中 successfulAuthentication(request, response, chain, authResult); }
整个程序的执行流程如下:
判断filter是否可以处理当前的请求,如果不可以则放行交给下一个filter
调用抽象方法attemptAuthentication进行验证,该方法由子类UsernamePasswordAuthenticationFilter实现
认证成功以后,回调一些与 session 相关的方法;
认证成功以后,认证成功后的相关回调方法;认证成功以后,认证成功后的相关回调方法;
1 2 3 4 5 6 7 8 9 10 11 12 13 14 15 16 17 18 19 20 21 protected void successfulAuthentication (HttpServletRequest request, HttpServletResponse response, FilterChain chain, Authentication authResult) throws IOException, ServletException { if (logger.isDebugEnabled()) { logger.debug("Authentication success. Updating SecurityContextHolder to contain: " + authResult); } SecurityContextHolder.getContext().setAuthentication(authResult); rememberMeServices.loginSuccess(request, response, authResult); if (this .eventPublisher != null ) { eventPublisher.publishEvent(new InteractiveAuthenticationSuccessEvent ( authResult, this .getClass())); } successHandler.onAuthenticationSuccess(request, response, authResult); }
将当前认证成功的 Authentication 放置到 SecurityContextHolder 中;
调用其它可扩展的 handlers 继续处理该认证成功以后的回调事件;(实现AuthenticationSuccessHandler接口即可)
UsernamePasswordAuthenticationFilter:
1 2 3 4 5 6 7 8 9 10 11 12 13 14 15 16 17 18 19 20 21 22 23 24 25 26 27 28 29 public Authentication attemptAuthentication (HttpServletRequest request, HttpServletResponse response) throws AuthenticationException { #1. 判断请求的方法必须为POST请求 if (postOnly && !request.getMethod().equals("POST" )) { throw new AuthenticationServiceException ( "Authentication method not supported: " + request.getMethod()); } #2. 从request中获取username和password String username = obtainUsername(request); String password = obtainPassword(request); if (username == null ) { username = "" ; } if (password == null ) { password = "" ; } username = username.trim(); #3. 构建UsernamePasswordAuthenticationToken(两个参数的构造方法setAuthenticated(false )) UsernamePasswordAuthenticationToken authRequest = new UsernamePasswordAuthenticationToken ( username, password); setDetails(request, authRequest); #4. 调用 AuthenticationManager 进行验证(子类ProviderManager遍历所有的AuthenticationProvider认证) return this .getAuthenticationManager().authenticate(authRequest); }
认证请求的方法必须为POST
从request中获取 username 和 password
封装Authenticaiton的实现类UsernamePasswordAuthenticationToken,(UsernamePasswordAuthenticationToken调用两个参数的构造方法setAuthenticated(false))
调用 AuthenticationManager 的 authenticate 方法进行验证;可参考ProviderManager 部分
AnonymousAuthenticationFilter 从上图中过滤器的执行顺序图中可以看出AnonymousAuthenticationFilter过滤器是在UsernamePasswordAuthenticationFilter等过滤器之后,如果它前面的过滤器都没有认证成功,Spring Security则为当前的SecurityContextHolder中添加一个Authenticaiton 的匿名实现类AnonymousAuthenticationToken;
1 2 3 4 5 6 7 8 9 10 11 12 13 14 15 16 17 18 19 20 21 22 23 24 25 26 27 28 29 30 31 32 33 34 35 36 37 38 39 40 41 42 public void doFilter (ServletRequest req, ServletResponse res, FilterChain chain) throws IOException, ServletException { #1. 如果前面的过滤器都没认证通过,则SecurityContextHolder中Authentication为空 if (SecurityContextHolder.getContext().getAuthentication() == null ) { #2. 为当前的SecurityContextHolder中添加一个匿名的AnonymousAuthenticationToken SecurityContextHolder.getContext().setAuthentication( createAuthentication((HttpServletRequest) req)); if (logger.isDebugEnabled()) { logger.debug("Populated SecurityContextHolder with anonymous token: '" + SecurityContextHolder.getContext().getAuthentication() + "'" ); } } else { if (logger.isDebugEnabled()) { logger.debug("SecurityContextHolder not populated with anonymous token, as it already contained: '" + SecurityContextHolder.getContext().getAuthentication() + "'" ); } } chain.doFilter(req, res); } #3. 创建匿名的AnonymousAuthenticationToken protected Authentication createAuthentication (HttpServletRequest request) { AnonymousAuthenticationToken auth = new AnonymousAuthenticationToken (key, principal, authorities); auth.setDetails(authenticationDetailsSource.buildDetails(request)); return auth; } #.创建一个用户名为anonymousUser 授权为ROLE_ANONYMOUS public AnonymousAuthenticationFilter (String key) { this (key, "anonymousUser" , AuthorityUtils.createAuthorityList("ROLE_ANONYMOUS" )); }
判断SecurityContextHolder中Authentication为否为空;
如果空则为当前的SecurityContextHolder中添加一个匿名的AnonymousAuthenticationToken(用户名为 anonymousUser 的AnonymousAuthenticationToken)
ExceptionTranslationFilter 异常处理过滤器,该过滤器用来处理在系统认证授权过程中抛出的异常(也就是下一个过滤器FilterSecurityInterceptor),主要是 处理 AuthenticationException 和 AccessDeniedException 。
1 2 3 4 5 6 7 8 9 10 11 12 13 14 15 16 17 18 19 20 21 22 23 24 25 26 27 28 29 30 31 32 33 34 35 36 37 38 39 40 41 42 43 44 public void doFilter (ServletRequest req, ServletResponse res, FilterChain chain) throws IOException, ServletException { HttpServletRequest request = (HttpServletRequest) req; HttpServletResponse response = (HttpServletResponse) res; try { chain.doFilter(request, response); logger.debug("Chain processed normally" ); } catch (IOException ex) { throw ex; } catch (Exception ex) { #.判断是不是AuthenticationException Throwable[] causeChain = throwableAnalyzer.determineCauseChain(ex); RuntimeException ase = (AuthenticationException) throwableAnalyzer .getFirstThrowableOfType(AuthenticationException.class, causeChain); if (ase == null ) { #. 判断是不是AccessDeniedException ase = (AccessDeniedException) throwableAnalyzer.getFirstThrowableOfType( AccessDeniedException.class, causeChain); } if (ase != null ) { handleSpringSecurityException(request, response, chain, ase); } else { if (ex instanceof ServletException) { throw (ServletException) ex; } else if (ex instanceof RuntimeException) { throw (RuntimeException) ex; } throw new RuntimeException (ex); } } }
FilterSecurityInterceptor 此过滤器为认证授权过滤器链中最后一个过滤器,该过滤器之后就是请求真正的/persons 服务
1 2 3 4 5 6 7 8 9 10 11 12 13 14 15 16 17 18 19 20 21 22 23 24 25 26 27 28 29 30 31 32 33 public void doFilter (ServletRequest request, ServletResponse response, FilterChain chain) throws IOException, ServletException { FilterInvocation fi = new FilterInvocation (request, response, chain); invoke(fi); } public void invoke (FilterInvocation fi) throws IOException, ServletException { if ((fi.getRequest() != null ) && (fi.getRequest().getAttribute(FILTER_APPLIED) != null ) && observeOncePerRequest) { fi.getChain().doFilter(fi.getRequest(), fi.getResponse()); } else { if (fi.getRequest() != null ) { fi.getRequest().setAttribute(FILTER_APPLIED, Boolean.TRUE); } #1. before invocation重要 InterceptorStatusToken token = super .beforeInvocation(fi); try { #2. 可以理解开始请求真正的 /persons 服务 fi.getChain().doFilter(fi.getRequest(), fi.getResponse()); } finally { super .finallyInvocation(token); } #3. after Invocation super .afterInvocation(token, null ); } }
before invocation重要
请求真正的 /persons 服务
after Invocation
三个部分中,最重要的是 #1,该过程中会调用 AccessDecisionManager 来验证当前已认证成功的用户是否有权限访问该资源;
before invocation: AccessDecisionManager 1 2 3 4 5 6 7 8 9 10 11 12 13 14 15 16 17 18 19 20 21 22 protected InterceptorStatusToken beforeInvocation (Object object) { ... Collection<ConfigAttribute> attributes = this .obtainSecurityMetadataSource() .getAttributes(object); ... Authentication authenticated = authenticateIfRequired(); try { #1. 重点 this .accessDecisionManager.decide(authenticated, object, attributes); } catch (AccessDeniedException accessDeniedException) { publishEvent(new AuthorizationFailureEvent (object, attributes, authenticated,accessDeniedException)); throw accessDeniedException; } ... }
authenticated就是当前认证的Authentication,object为当前请求的 url:/persons, getAttributes方法就是使用当前的访问资源路径去匹配我们自己定义的匹配规则。
AccessDecisionManager 是如何授权的?
Spring Security默认使用AffirmativeBased实现AccessDecisionManager 的 decide 方法来实现授权
1 2 3 4 5 6 7 8 9 10 11 12 13 14 15 16 17 18 19 20 21 22 23 24 25 26 27 28 29 30 31 32 33 34 35 public void decide (Authentication authentication, Object object, Collection<ConfigAttribute> configAttributes) throws AccessDeniedException { int deny = 0 ; #1. 调用AccessDecisionVoter 进行vote(投票) for (AccessDecisionVoter voter : getDecisionVoters()) { int result = voter.vote(authentication, object, configAttributes); if (logger.isDebugEnabled()) { logger.debug("Voter: " + voter + ", returned: " + result); } switch (result) { #1.1 只要有voter投票为ACCESS_GRANTED,则通过 直接返回 case AccessDecisionVoter.ACCESS_GRANTED: return ; @#1.2 只要有voter投票为ACCESS_DENIED,则记录一下 case AccessDecisionVoter.ACCESS_DENIED: deny++; break ; default : break ; } } if (deny > 0 ) { #2. 如果有一个及以上AccessDecisionVoter(姑且称之为投票者吧)都投ACCESS_DENIED,则直接就不通过了 throw new AccessDeniedException (messages.getMessage( "AbstractAccessDecisionManager.accessDenied" , "Access is denied" )); } checkAllowIfAllAbstainDecisions(); }
调用AccessDecisionVoter 进行vote(投票)
只要有投通过(ACCESS_GRANTED)票,则直接判为通过。
如果没有投通过则 deny++ ,最后判断if(deny>0 抛出AccessDeniedException(未授权)
SpringSecurityFilterChain过滤器加载流程 DelegatingFilterProxy 它的包结构:org.springframework.web.filter,它本身是 Spring Web 包中的类,并不是 SpringSecurity 中的类。因为 Spring 考虑到了多种使用场景,自然希望将侵入性降到最低,所以使用了这个委托代理类来代理真正的 SpringSecurityFilterChain。
DelegatingFilterProxy 实现了 javax.servlet.Filter 接口,使得它可以作为一个 java web 的标准过滤器,其职责也很简单,只负责调用真正的 SpringSecurityFilterChain。
1 2 3 4 5 6 7 8 9 10 11 12 13 14 15 16 17 18 19 20 21 22 23 24 25 26 27 28 29 30 31 32 33 34 35 36 37 38 39 40 41 42 43 44 45 46 47 48 49 50 51 52 53 54 55 56 57 58 59 60 61 62 63 64 65 66 67 68 69 70 71 72 73 74 75 76 public class DelegatingFilterProxy extends GenericFilterBean { private WebApplicationContext webApplicationContext; private String targetBeanName; private volatile Filter delegate; private final Object delegateMonitor = new Object (); public DelegatingFilterProxy (String targetBeanName, WebApplicationContext wac) { Assert.hasText(targetBeanName, "Target Filter bean name must not be null or empty" ); this .setTargetBeanName(targetBeanName); this .webApplicationContext = wac; if (wac != null ) { this .setEnvironment(wac.getEnvironment()); } } @Override protected void initFilterBean () throws ServletException { synchronized (this .delegateMonitor) { if (this .delegate == null ) { if (this .targetBeanName == null ) { this .targetBeanName = getFilterName(); } WebApplicationContext wac = findWebApplicationContext(); if (wac != null ) { this .delegate = initDelegate(wac); } } } } @Override public void doFilter (ServletRequest request, ServletResponse response, FilterChain filterChain) throws ServletException, IOException { Filter delegateToUse = this .delegate; if (delegateToUse == null ) { synchronized (this .delegateMonitor) { delegateToUse = this .delegate; if (delegateToUse == null ) { WebApplicationContext wac = findWebApplicationContext(); delegateToUse = initDelegate(wac); } this .delegate = delegateToUse; } } invokeDelegate(delegateToUse, request, response, filterChain); } protected Filter initDelegate (WebApplicationContext wac) throws ServletException { Filter delegate = wac.getBean(getTargetBeanName(), Filter.class); if (isTargetFilterLifecycle()) { delegate.init(getFilterConfig()); } return delegate; } protected void invokeDelegate ( Filter delegate, ServletRequest request, ServletResponse response, FilterChain filterChain) throws ServletException, IOException { delegate.doFilter(request, response, filterChain); } }
<1> 可以发现整个 DelegatingFilterProxy 的逻辑就是为了调用 private volatile Filter delegate;
<2> 可以看到,DelegatingFilterProxy 尝试去容器中获取名为 targetBeanName 的类,而 targetBeanName 的默认值便是 Filter 的名称,也就是 springSecurityFilterChain
DelegatingFilterProxy 只是名称和 targetBeanName 叫 springSecurityFilterChain,真正容器中的 Bean(name=”springSecurityFilterChain”) 其实另有其人——通过 debug,我们发现了真正的 springSecurityFilterChain — FilterChainProxy。
SpringSecurityFilterChain 是什么时候被放进去的?
这就得说到老朋友 WebSecurity 了,还记得一般我们都会选择使用 @EnableWebSecurity 和 WebSecurityConfigurerAdapter 来进行 web 安全配置吗,来到 WebSecurity 的源码:
1 2 3 4 5 6 7 8 9 10 11 12 13 14 15 16 17 18 19 20 21 22 23 24 25 26 27 public final class WebSecurity extends AbstractConfiguredSecurityBuilder <Filter, WebSecurity> implements SecurityBuilder <Filter>, ApplicationContextAware { @Override protected Filter performBuild () throws Exception { int chainSize = ignoredRequests.size() + securityFilterChainBuilders.size(); List<SecurityFilterChain> securityFilterChains = new ArrayList <SecurityFilterChain>( chainSize); for (RequestMatcher ignoredRequest : ignoredRequests) { securityFilterChains.add(new DefaultSecurityFilterChain (ignoredRequest)); } for (SecurityBuilder<? extends SecurityFilterChain > securityFilterChainBuilder : securityFilterChainBuilders) { securityFilterChains.add(securityFilterChainBuilder.build()); } FilterChainProxy filterChainProxy = new FilterChainProxy (securityFilterChains); if (httpFirewall != null ) { filterChainProxy.setFirewall(httpFirewall); } filterChainProxy.afterPropertiesSet(); Filter result = filterChainProxy; postBuildAction.run(); return result; } }
<1> 最终定位到 WebSecurity 的 performBuild 方法,我们之前配置了一堆参数的 WebSecurity 最终帮助我们构建了 FilterChainProxy。
并且,最终在 org.springframework.security.config.annotation.web.configuration.WebSecurityConfiguration中被注册为默认名称为 SpringSecurityFilterChain。
FilterChainProxy 它才是真正的 springSecurityFilterChain,我们来看看它的源码(有删减,不影响理解)。
1 2 3 4 5 6 7 8 9 10 11 12 13 14 15 16 17 18 19 20 21 22 23 24 25 26 27 28 29 30 31 32 33 34 35 36 37 38 39 40 41 42 43 44 45 46 47 48 49 50 51 52 53 54 55 public class FilterChainProxy extends GenericFilterBean { private List<SecurityFilterChain> filterChains; public FilterChainProxy (SecurityFilterChain chain) { this (Arrays.asList(chain)); } public FilterChainProxy (List<SecurityFilterChain> filterChains) { this .filterChains = filterChains; } @Override public void afterPropertiesSet () { filterChainValidator.validate(this ); } public void doFilter (ServletRequest request, ServletResponse response, FilterChain chain) throws IOException, ServletException { doFilterInternal(request, response, chain); } private void doFilterInternal (ServletRequest request, ServletResponse response, FilterChain chain) throws IOException, ServletException { FirewalledRequest fwRequest = firewall .getFirewalledRequest((HttpServletRequest) request); HttpServletResponse fwResponse = firewall .getFirewalledResponse((HttpServletResponse) response); List<Filter> filters = getFilters(fwRequest); if (filters == null || filters.size() == 0 ) { fwRequest.reset(); chain.doFilter(fwRequest, fwResponse); return ; } VirtualFilterChain vfc = new VirtualFilterChain (fwRequest, chain, filters); vfc.doFilter(fwRequest, fwResponse); } private List<Filter> getFilters (HttpServletRequest request) { for (SecurityFilterChain chain : filterChains) { if (chain.matches(request)) { return chain.getFilters(); } } return null ; } }
看 FilterChainProxy 的名字就可以发现,它依旧不是真正实施过滤的类,它内部维护了一个 SecurityFilterChain,这个过滤器链才是请求真正对应的过滤器链,并且同一个 Spring 环境下,可能同时存在多个安全过滤器链,如 private List filterChains 所示,需要经过 chain.matches(request) 判断到底哪个过滤器链匹配成功,每个 request 最多只会经过一个 SecurityFilterChain。