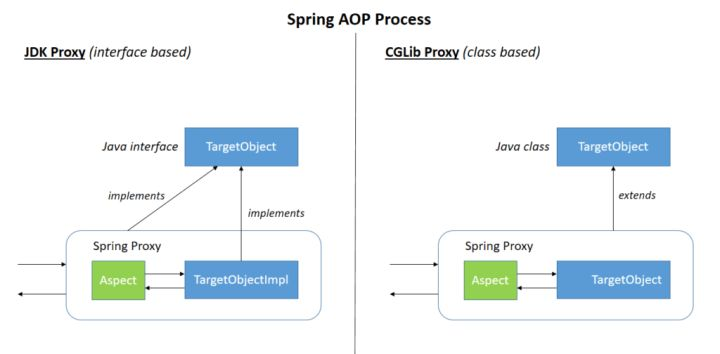
对AOP的理解 AOP(Aspect-Oriented Programming:面向切面编程),它实际做的就是将业务和一些非业务进行拆解,降低彼此业务模块与非业务模块的耦合度,便于后续的扩展维护。例如权限校验、日志管理、事务处理等都可以使用AOP实现。而Spring就是基于动态代理实现AOP的。如果被代理的类有实现接口的话,就会基于JDK Proxy完成代理的创建。反之就是通过Cglib完成代理创建。
Spring AOP和AspectJ AOP的区别知道吗?
答: 其实Spring AOP属于运行时增强,基于代理(Proxying)实现的。而AspectJ AOP属于编译时增强,基于字节码操作(Bytecode Manipulation)实现的。相比之下后者比前者更成熟、更强大一些。如果在切面不多的情况下,两者差异是不大的,如果切面非常多的话,后者性能会比强者好很多。
AOP中有很多核心术语,分别是:
目标(Target): 这就被代理的对象,例如我们希望对UserService每个方法进行增强(在不动它的代码情况下增加一些非业务的动作),那么这个UserService就是目标。
代理(Proxy): 就是给你被代理后的对象的厂商,例如我们上面说过希望对UserService每个方法进行增强,那么给用户返回增强后的对象的类就是代理类。
连接点(JoinPoint):目标对象,每一个可能可以被增强的方法都可以称为连接点,尽管它最后可能不会被增强。
切入点(Pointcut): 连接点中确确实实被做增强操作的方法就叫切入点。
通知(Advice): 不要被表面的语义误导,通知并不是告知某人的意思,通知的意思是拦截对象后,做的增强操作。
切面(Aspect): 切入点(Pointcut)+通知(Advice)
织入(Weaving):把通知的动作融入到对象中,生成代理对象的过程就叫做织入
AspectJ 通知类型有哪些?
答: 有很多,分别是:
Before(前置通知): 目标对象方法调用前触发增强。After (后置通知):目标对象方法调用后进行增强。AfterReturning(返回通知):目标对象方法执行结束,返回值时进行增强。AfterThrowing(异常通知):目标对象方法执行报错并抛出时做的增强。Around(环绕通知):这个比较常用了,目标对象方法调用前后我们可以做各种增强操作,甚至不调用对象的方法都能做到。
动态代理实现 JDK 动态代理 使用 Spring 实现 JDK 动态代理,代码如下:
1
2
3
4
5
6
7
8
9
10
11
12
13
14
15
16
17
18
19
20
21
22
23
24
25
26
27
28
29
30
31
32
33
34
35
36
37
38
39
40
41
public class TestJDKProxy { public static void main (String[] args) { UserService userService = new UserServiceImpl (); InvocationHandler handler = new InvocationHandler (){ @Override public Object invoke (Object proxy, Method method, Object[] args) throws Throwable { log.info("------proxy log ------" ); Object res = method.invoke(userService,args); return res; } }; UserService userServiceProxy = (UserService)Proxy.newProxyInstance(TestJDKProxy.class.getClassLoader(),userService.getClass().getInterfaces(),handler); userService.login("suns" ,"123456" ); userServiceProxy.register(new User ()); } }
Cglib 动态代理 1 2 3 4 5 6 7 8 9 10 11 12 13 14 15 16 17 18 19 20 21 22 23 24 25 26 27 28 29 30 31 32 33 34 35 36 37 38 39 40 public class TestCglib { public static void main (String[] args) { UserService userService = new UserServiceImpl (); Enhancer enhancer = new Enhancer (); enhancer.setClassLoader(TestCglib.class.getClassLoader()); enhancer.setSuperClass(userService.getClass()); MethodInterceptor interceptor = new MethodInterceptor (){ @Override public Object intercept (Object o, Method method, Object[] args, MethodProxy methodProxy) throws Throwable { log.info("------cglib log ------" ); Object res = method.invoke(userService,args); return res; } }; enhancer.setCallback(interceptor); UserService userServiceProxy = (UserService)enhancer.create(); userServiceProxy.login("suns" ,"123456" ); userServiceProxy.register(new User ()); } }
关于 @EnableAspectJAutoProxy 注解,在AopAutoConfiguration这个类里可以看到相关定义。
Cglib代理:@EnableAspectJAutoProxy(proxyTargetClass = true)
JDK代理:@EnableAspectJAutoProxy(proxyTargetClass = false)
Spring AOP 代理默认实现 JDK,SpringBoot AOP 代理默认实现 Cglib。
1 2 3 4 5 6 7 8 9 10 11 12 13 14 15 16 17 18 19 20 @Configuration(proxyBeanMethods = false) @ConditionalOnClass(Advice.class) static class AspectJAutoProxyingConfiguration { @Configuration(proxyBeanMethods = false) @EnableAspectJAutoProxy(proxyTargetClass = false) @ConditionalOnProperty(prefix = "spring.aop", name = "proxy-target-class", havingValue = "false") static class JdkDynamicAutoProxyConfiguration { } @Configuration(proxyBeanMethods = false) @EnableAspectJAutoProxy(proxyTargetClass = true) @ConditionalOnProperty(prefix = "spring.aop", name = "proxy-target-class", havingValue = "true", matchIfMissing = true) static class CglibAutoProxyConfiguration { } }
AOP源码 注解切面类名为:AnnotationAwareAspectJAutoProxyCreator
从类图中我们可以看到它继承了BeanPostProcessor以及BeanFactoryAware这就意味着这个类在bean工厂加载期间以及bean初始化前后会对bean做一些手脚。 而且我们看到这个类继承了AbstractAutoProxyCreator,这就意味它的抽象类一定为当前类做了某些方法的模板,即模板方法模式 。 笔者贴出了bean初始化前置处理器的postProcessBeforeInstantiation的核心逻辑,可以看到AbstractAutoProxyCreator里面会判断当前传入的bean是否是AOP类,如果是则将其生成通知器类然后放入缓存advisedBeans中。
1 2 3 4 5 6 7 8 9 10 11 12 13 14 15 16 17 18 @Override public Object postProcessBeforeInstantiation (Class<?> beanClass, String beanName) { Object cacheKey = getCacheKey(beanClass, beanName); ...... if (isInfrastructureClass(beanClass) || shouldSkip(beanClass, beanName)) { this .advisedBeans.put(cacheKey, Boolean.FALSE); return null ; } } ....... } ...... }
判断是否是AOP类的逻辑方法如下所示,isInfrastructureClass就是判断这个类是否属于通知或者切点或者通知器Advisor类,如果是就返回true。
1 2 3 4 5 6 7 8 9 10 11 protected boolean isInfrastructureClass (Class<?> beanClass) { boolean retVal = Advice.class.isAssignableFrom(beanClass) || Pointcut.class.isAssignableFrom(beanClass) || Advisor.class.isAssignableFrom(beanClass) || AopInfrastructureBean.class.isAssignableFrom(beanClass); if (retVal && logger.isTraceEnabled()) { logger.trace("Did not attempt to auto-proxy infrastructure class [" + beanClass.getName() + "]" ); } return retVal; }
判断是否跳过的逻辑也很简单,如下所示,找到所有的通知器,判断当前这个bean是否这里面某个通知器名字一样,如果一样就返回true。
1 2 3 4 5 6 7 8 9 10 11 12 13 @Override protected boolean shouldSkip (Class<?> beanClass, String beanName) { List<Advisor> candidateAdvisors = findCandidateAdvisors(); for (Advisor advisor : candidateAdvisors) { if (advisor instanceof AspectJPointcutAdvisor && ((AspectJPointcutAdvisor) advisor).getAspectName().equals(beanName)) { return true ; } } return super .shouldSkip(beanClass, beanName); }
我们不妨看看findCandidateAdvisors的逻辑,可以看到它又会调用一个findCandidateAdvisors查找通知器
1 2 3 4 5 6 7 8 9 10 @Override protected List<Advisor> findCandidateAdvisors () { List<Advisor> advisors = super .findCandidateAdvisors(); if (this .aspectJAdvisorsBuilder != null ) { advisors.addAll(this .aspectJAdvisorsBuilder.buildAspectJAdvisors()); } return advisors; }
核心逻辑来了buildAspectJAdvisors
1 2 3 4 5 6 7 8 9 10 11 12 13 14 15 16 17 18 19 20 21 22 23 24 25 26 27 public List<Advisor> buildAspectJAdvisors () { List<String> aspectNames = this .aspectBeanNames; if (aspectNames == null ) { synchronized (this ) { aspectNames = this .aspectBeanNames; if (aspectNames == null ) { MetadataAwareAspectInstanceFactory factory = new BeanFactoryAspectInstanceFactory (this .beanFactory, beanName); Class<?> beanType = this .beanFactory.getType(beanName); if (this .advisorFactory.isAspect(beanType)) { List<Advisor> classAdvisors = this .advisorFactory.getAdvisors(factory); if (this .beanFactory.isSingleton(beanName)) { this .advisorsCache.put(beanName, classAdvisors); } ...... return advisors; } } } ..... }
最终我们不断步进就会看到,通过上述的factory各种参数信息找到这个bean的切点,切点表达式,方法名,切面名称构成一个增强器。
1 2 3 4 5 6 7 8 9 10 11 12 13 14 15 16 17 @Override @Nullable public Advisor getAdvisor (Method candidateAdviceMethod, MetadataAwareAspectInstanceFactory aspectInstanceFactory, int declarationOrderInAspect, String aspectName) { validate(aspectInstanceFactory.getAspectMetadata().getAspectClass()); AspectJExpressionPointcut expressionPointcut = getPointcut( candidateAdviceMethod, aspectInstanceFactory.getAspectMetadata().getAspectClass()); if (expressionPointcut == null ) { return null ; } return new InstantiationModelAwarePointcutAdvisorImpl (expressionPointcut, candidateAdviceMethod, this , aspectInstanceFactory, declarationOrderInAspect, aspectName); }
封装成增强器后,如何将其他类变成代理类?(重点) 答: 这就到bean初始化后置操作了,如下代码所示,从缓存中获取这个bean,如果这个bean不在earlyProxyReferences中,则调用wrapIfNecessary,这个方法会在必要情况下根据策略决定用cglib或者jdk代理完成某些需要被代理的类的创建。
1 2 3 4 5 6 7 8 9 10 11 @Override public Object postProcessAfterInitialization (@Nullable Object bean, String beanName) { if (bean != null ) { Object cacheKey = getCacheKey(bean.getClass(), beanName); if (this .earlyProxyReferences.remove(cacheKey) != bean) { return wrapIfNecessary(bean, beanName, cacheKey); } } return bean; }
那你知道他们在bean生命周期的那个阶段实现的呢? 答: 上面的类图已经写的非常清楚了,在bean初始化前后也就我们常说的BPP阶段完成AOP类的缓存以及通知器创建。在bean初始化后,根据需要结合通知器完成代理类的改造。
代理的创建过程是什么呢? 答: AOP提供了一个默认工厂根据类是否有继承接口或者是否就是目标类决定创建的策略。然后根据不同的策略决定代理类的创建。
1 2 3 4 5 6 7 8 9 10 11 12 13 14 15 16 17 @Override public AopProxy createAopProxy (AdvisedSupport config) throws AopConfigException { if (config.isOptimize() || config.isProxyTargetClass() || hasNoUserSuppliedProxyInterfaces(config)) { Class<?> targetClass = config.getTargetClass(); if (targetClass == null ) { throw new AopConfigException ("TargetSource cannot determine target class: " + "Either an interface or a target is required for proxy creation." ); } if (targetClass.isInterface() || Proxy.isProxyClass(targetClass)) { return new JdkDynamicAopProxy (config); } return new ObjenesisCglibAopProxy (config); } else { return new JdkDynamicAopProxy (config); } }
以下便是jdk代理的创建策略
1 2 3 4 5 6 7 8 9 10 @Override public Object getProxy (@Nullable ClassLoader classLoader) { ......... Class<?>[] proxiedInterfaces = AopProxyUtils.completeProxiedInterfaces(this .advised, true ); findDefinedEqualsAndHashCodeMethods(proxiedInterfaces); return Proxy.newProxyInstance(classLoader, proxiedInterfaces, this ); }
以下便是cglib的创建策略
1 2 3 4 5 6 7 8 9 10 11 12 13 14 15 16 17 18 19 20 21 22 23 24 25 26 27 28 29 30 31 32 33 @Override public Object getProxy (@Nullable ClassLoader classLoader) { ....... try { ....... 将当前类信息通过enhancer 生成代理对象 Enhancer enhancer = createEnhancer(); if (classLoader != null ) { enhancer.setClassLoader(classLoader); if (classLoader instanceof SmartClassLoader && ((SmartClassLoader) classLoader).isClassReloadable(proxySuperClass)) { enhancer.setUseCache(false ); } } enhancer.setSuperclass(proxySuperClass); enhancer.setInterfaces(AopProxyUtils.completeProxiedInterfaces(this .advised)); enhancer.setNamingPolicy(SpringNamingPolicy.INSTANCE); enhancer.setStrategy(new ClassLoaderAwareGeneratorStrategy (classLoader)); Callback[] callbacks = getCallbacks(rootClass); Class<?>[] types = new Class <?>[callbacks.length]; for (int x = 0 ; x < types.length; x++) { types[x] = callbacks[x].getClass(); } return createProxyClassAndInstance(enhancer, callbacks); } ........ } catch (Throwable ex) { ...... } }
手写事务-AOP实现 基于以上对 AOP 的理解,我们可以自己实现AOP,就以事务的实现为例。
首先列出建表语句:
1 2 3 4 5 6 7 8 9 DROP TABLE IF EXISTS `user_test`;CREATE TABLE `user_test` ( `id` int (11 ) NOT NULL AUTO_INCREMENT, `user_name` varchar (255 ) DEFAULT NULL , `balance` int (11 ) DEFAULT NULL , PRIMARY KEY (`id`) ) ENGINE= InnoDB AUTO_INCREMENT= 9 DEFAULT CHARSET= utf8; INSERT INTO `user_test` VALUES (1 , 'a' , 10 );INSERT INTO `user_test` VALUES (2 , 'b' , 20 );
自定义事务注解 对于声明式的事务,我们可以自定义注解实现。
1 2 3 4 5 6 7 @Target({ElementType.TYPE, ElementType.METHOD}) @Retention(RetentionPolicy.RUNTIME) @Inherited @Documented public @interface MyTransaction { Propagation propagation () default Propagation.REQUIRED; }
事务的传播属性可以在枚举类中定义
1 2 3 4 5 6 7 8 9 10 11 12 13 14 15 16 public enum Propagation { REQUIRED(0 ), REQUIRES_NEW(1 ); private final int value; Propagation(int value) { this .value = value; } public int value () { return this .value; } }
数据库连接资源管理 数据库的连接是由 ThreadLocal 控制的,ThreadLocal 存储的类型是一个 Map
1 2 3 4 5 6 7 8 9 10 11 12 13 14 15 16 17 18 19 20 21 22 23 24 25 26 27 28 29 30 31 32 33 34 35 36 37 38 39 40 41 42 43 44 45 46 47 48 49 50 51 52 53 54 55 56 57 58 59 60 61 62 63 public class ConnectionHolder { private static final ThreadLocal<ConnectionHolder> CONNECTION_THREAD_LOCAL = new ThreadLocal <>(); private Connection curConnection; private ConnectionHolder lastConnectionHolder; public static void unbindResource () { ConnectionHolder lastConnectionHolder = CONNECTION_THREAD_LOCAL.get(); if (lastConnectionHolder == null ) { return ; } CONNECTION_THREAD_LOCAL.set(lastConnectionHolder.getLastConnectionHolder()); } public static ConnectionHolder getResource () { return CONNECTION_THREAD_LOCAL.get(); } public static void bindResource (ConnectionHolder connectionHolder) { CONNECTION_THREAD_LOCAL.set(connectionHolder); } public static Connection getCurConnectionStatic () { ConnectionHolder connectionHolder = ConnectionHolder.getResource(); return connectionHolder != null ? connectionHolder.getCurConnection() : null ; } public Connection getCurConnection () { return curConnection; } public void setCurConnection (Connection curConnection) { this .curConnection = curConnection; } public ConnectionHolder getLastConnectionHolder () { return lastConnectionHolder; } public void setLastConnectionHolder (ConnectionHolder lastConnectionHolder) { this .lastConnectionHolder = lastConnectionHolder; } }
事务管理 自定义事务管理器
1 2 3 4 5 6 7 8 9 10 11 12 13 14 15 16 17 18 19 20 21 22 23 24 25 26 27 28 29 30 31 32 33 34 35 36 37 38 39 40 41 42 43 44 45 46 47 48 49 50 51 52 53 54 55 56 57 58 59 60 61 62 public class TransactionManager { private DataSource dataSource; public TransactionManager (ObjectProvider<DataSource> dataSourceProvider) { this .dataSource = dataSourceProvider.getIfAvailable(); } public TransactionInfo createTransactionIfNecessary (MyTransaction miniTransactional) { TransactionInfo transactionInfo = new TransactionInfo (); boolean needNew = false ; if (miniTransactional != null && miniTransactional.propagation() == Propagation.REQUIRES_NEW) { needNew = true ; } ConnectionHolder curConnectionHolder = transactionInfo.createConnectionIfNecessary(this .dataSource, needNew); transactionInfo.setConnection(curConnectionHolder.getCurConnection()); ConnectionHolder.bindResource(curConnectionHolder); return transactionInfo; } public void rollBack (TransactionInfo transactionInfo) throws SQLException { try { if (transactionInfo.isNewTransaction()) { transactionInfo.getConnection().rollback(); } } finally { TransactionManager.cleanupAfterCompletion(); } } public void commit (TransactionInfo transactionInfo) throws SQLException { try { if (transactionInfo.isNewTransaction()) { transactionInfo.getConnection().commit(); } } finally { TransactionManager.cleanupAfterCompletion(); } } public static void cleanupAfterCompletion () { Connection curConnection = ConnectionHolder.getCurConnectionStatic(); if (curConnection!=null ){ try { curConnection.close(); } catch (SQLException throwables) { throwables.printStackTrace(); } } ConnectionHolder.unbindResource(); } }
自定义 transactionInfo
1 2 3 4 5 6 7 8 9 10 11 12 13 14 15 16 17 18 19 20 21 22 23 24 25 26 27 28 29 30 31 32 33 34 35 36 37 38 39 40 41 42 43 44 45 46 47 48 49 50 public class TransactionInfo { private Connection connection; private boolean newTransaction = false ; public ConnectionHolder createConnectionIfNecessary (DataSource dataSource, boolean needNew) { ConnectionHolder curConnectionHolder = null ; ConnectionHolder lastConnectionHolder = ConnectionHolder.getResource(); if (lastConnectionHolder == null || needNew) { curConnectionHolder = newOneConnectionHolder(dataSource, lastConnectionHolder); } else if (!needNew) { curConnectionHolder = lastConnectionHolder; } return curConnectionHolder; } private ConnectionHolder newOneConnectionHolder (DataSource dataSource, ConnectionHolder lastConnectionHolder) { this .newTransaction = true ; ConnectionHolder connectionHolder = new ConnectionHolder (); connectionHolder.setLastConnectionHolder(lastConnectionHolder); Connection newConnection = null ; try { newConnection = dataSource.getConnection(); newConnection.setAutoCommit(false ); } catch (SQLException throwables) { throwables.printStackTrace(); } connectionHolder.setCurConnection(newConnection); return connectionHolder; } public Connection getConnection () { return connection; } public void setConnection (Connection connection) { this .connection = connection; } public boolean isNewTransaction () { return newTransaction; } public void setNewTransaction (boolean newTransaction) { this .newTransaction = newTransaction; } }
AOP实现事务逻辑 使用@Aspect实现AOP,定义切入点和真正实现AOP的切面方法。
1 2 3 4 5 6 7 8 9 10 11 12 13 14 15 16 17 18 19 20 21 22 23 24 25 26 27 28 29 30 31 32 33 34 35 36 37 @Aspect public class TransactionAspect { private TransactionManager transactionManager; public TransactionAspect (TransactionManager transactionManager) { this .transactionManager = transactionManager; } @Pointcut(value = "@within(com.jrrl.transaction.aop.MyTransaction)") public void point () { } @Around("point()") public Object around (ProceedingJoinPoint joinPoint) throws Throwable{ Object res = null ; MyTransaction myTransaction = ((MethodSignature) joinPoint.getSignature()).getMethod().getAnnotation(MyTransaction.class); TransactionInfo transactionInfo = transactionManager.createTransactionIfNecessary(myTransaction); try { res = joinPoint.proceed(); } catch (Exception e) { transactionManager.rollBack(transactionInfo); throw e; } transactionManager.commit(transactionInfo); return res; } }
事务的传播属性
传播属性
概念
建议
PROPAGATION_REQUIRED(默认传播属性)如果当前存在事务,则加入该事务;如果当前没有事务,则创建一个新的事务。
增删改操作@Transactional(rollbackFor = Exception.class)
PROPAGATION_SUPPORTS如果当前存在事务,则加入该事务;如果当前没有事务,则以非事务的方式继续运行。
查询操作@Transactional(propagation=Propagation.SUPPORTS, readOnly = true)
PROPAGATION_REQUIRES_NEW创建一个新的事务,如果当前存在事务,则把当前事务挂起。
PROPAGATION_NESTED如果当前存在事务,则创建一个事务作为当前事务的嵌套事务来运行;如果当前没有事务,则该取值等价于TransactionDefinition.PROPAGATION_REQUIRED。
PROPAGATION_MANDATORY如果当前存在事务,则加入该事务;如果当前没有事务,则抛出异常。(mandatory:强制性)
需要注意的是,在同一个类中非事务方法调用事务方法,事务失效问题
原因:
spring 在扫描bean的时候会扫描方法上是否包含@Transactional注解,如果包含,spring会为这个bean动态地生成一个子类(即代理类,proxy),代理类是继承原来那个bean的。此时,当这个有注解的方法被调用的时候,实际上是由代理类来调用的,代理类在调用之前就会启动transaction。
然而,如果这个有注解的方法是被同一个类中的其他方法调用的,那么该方法的调用并没有通过代理类,而是直接通过原来的那个bean,所以就不会启动transaction,我们看到的现象就是@Transactional注解无效。
解决方法:
1 2 3 4 5 6 7 8 9 10 11 12 @Override public void noneTransactionMethod () { xxxServiceImpl bean = SpringUtils.getBean(xxxServiceImpl.class); bean.transactionMethod(); } @Override @Transactional(rollbackFor = Exception.class) public void transactionMethod () { ... }